
![By pixelbuddha [CC BY 3.0 (http://creativecommons.org/licenses/by/3.0)], via Wikimedia Commons](/static/assets/img/search/Search_ballonicon2.svg.png "Double click Ctrl")

It’s true that web technologies are slowly adapting for native app development via asmjs, NativeScript, Electron, WebAssembly, React Native but future web application development will be more complex because of Emerging Connected Cars and VR Ecosystems.
On the other hand C++, Go like programming languages are adapting for web development to build performant web apps and PHP is becoming a dying language. So learning a systems programming language is much wiser in these days. We have many trending languages like JavaScript, Julia, Go, Rust, Swift but explaining the pros and cons of each language is beyond the purpose of this article. I chose Rust and it caught my interest at the first sight.
http://thoughtram.io/rust-and-nickel/#/11
Rust is a systems programming language which focused on safety, speed, and concurrency at the same time. It’s a very low level language and it doesn’t use Garbage Collection(GC) by default.
🔎 One of Rust’s most unique and compelling features is Ownership, which uses to achieves memory safety. Rust creates memory pointers optimistically, checks memory pointers’ limited accesses at the compiler time with the usage of References and Borrowing. And it does automatic compile time memory management by checking the Lifetimes.
Rust is a very modern language. It uses LLVM on its backend. Rust supports a mixture of imperative procedural, concurrent actor, object-oriented and pure functional styles. It also supports generic programming and metaprogramming, in both static and dynamic styles.
📖 By the way Rust is not a particularly original language. Its design elements came from a wide range of sources.
and etc.
It’s low level, safe, modern and feature rich. So it’s suitable for any type of software development. Other than that it’s a properly designed language. So you will be able to learn/practice new programming paradigms with Rust. Hope you got excited. OK, let’s start.
There are many ways to install Rust on your system. For the moment the official way to install Rust is using Rustup.
⭐️ If you are on Microsoft Windows, you have to install Visual C++ Build Tools 2013 or higher. The recommended way is installing Visual C++ 2015 Build Tools which requires additional 3–4 GBs.
📖 Rustup installs The Rust Programming Language from the official release channels, enabling you to easily switch between stable, beta, and nightly compilers and keep them updated. It makes cross-compiling simpler with binary builds of the standard library for common platforms.
📖 Rustup installs rustc, cargo, rustup and other standard tools to Cargo’s bin directory. On Unix it is located at $HOME/.cargo/bin and on Windows at %USERPROFILE%\.cargo\bin. This is the same directory that cargo installwill install Rust programs and Cargo plugins.
💡 More information can be found on the Github page of Rustup project.
After installing Rust you can check the current version by typing rustc --version or rustc -V on your terminal to verify the success of the installation.
fn main() {
    println!("Hello, world!");
}
fn means function. main function is the beginning of every Rust program. println! prints text to the console and its ! indicate that it’s a macro instead of a function.
💡 Rust files should have .rs file extension and if you’re using more than one word for the file name, follow the snake_case.
rustc file.rs./file on Linux and Mac or file.exe on Windows💯 These are the other usages of println! macro,
fn main() {
    println!("{}, {}!", "Hello", "world"); // Hello, world!
    println!("{0}, {1}!", "Hello", "world"); // Hello, world!
    println!("{greeting}, {name}!", greeting="Hello", name="world"); // Hello, world!

    println!("{:?}", [1,2,3]); // [1, 2, 3]
    println!("{:#?}", [1,2,3]);
    /*
        [
            1,
            2,
            3
        ]
    */

    // 🔎 format! macro is used to store the formatted STRING
    let x = format!("{}, {}!", "Hello", "world");
    println!("{}", x); // Hello, world!

    let y = String::from("Hello, ") + "world!";
    println!("{}", y); // Hello, world!
}
Cargo is Rust’s build-in Package Manager. But mainly it uses for,
cargo newcargo updatecargo buildcargo runcargo test cargo docOther than that there are some cargo commands, especially for publishing crates directly via cargo.
cargo login : acquiring an API tokencargo package : make the local create uploadable to crates.iocargo publish : make the local create uploadable to crates.io and upload the crate⭐️ A crate is a package. Crates can be shared via Cargo.
A crate can produce an executable or a library. In other words, it can be a binary crate or a library crate.
cargo new crate_name --bin : produces an executablecargo new crate_name --lib* *OR cargo new crate_name : produces a libraryThe first one generates,
├── Cargo.toml
└── src
    └── main.rs
and the second one generates,
├── Cargo.toml
└── src
    └── lib.rs
💡 When we build a binary crate via cargo build or cargo run, the executable file will be stored in target/debug/ folder. But when build it via cargo build –release for a release it will be stored in target/release/ folder.
This is how Cargo Docs describes about the recommended Project Layout,
.
├── Cargo.lock
├── Cargo.toml
├── benches
│   └── large-input.rs
├── examples
│   └── simple.rs
├── src
│   ├── bin
│   │   └── another_executable.rs
│   ├── lib.rs
│   └── main.rs
└── tests
    └── some-integration-tests.rs
src/lib.rs.src/main.rs.src/bin/*.rs.tests directory (unit tests go in each file they’re testing).examples directory.benches directory.
Nested block comments are supported.
💡 Always avoid block comments, Use line comments instead.
/// Line comments; document the next item
/** Block comments; document the next item */

//! Line comments; document the enclosing item
/*! Block comments; document the enclosing item !*/
Doc comments support Markdown notations. Using cargo doc, the HTML documentation can be generated from these doc comments. Let’s see the difference between the two sets of doc comments.
/// This module contains tests
mod test {
    // ...
}


mod test {
    //! This module contains tests

    // ...
}
As you can see both use to document the same module. First comment has been added before the module while the second one has been added inside the module.
💡 Only use //! to write crate and module-level documentation, nothing else. When using mod blocks, use /// outside of the block.
Also we can use doc attributes for documenting the code. 💡 An attribute is a general, free-form metadatum that is interpreted according to name, convention, and language and compiler version. Any item declaration may have an attribute applied to it. In here each comments are equivalent to relevant data attributes.
/// Foo
#[doc="Foo"]

//! Foo
#![doc="Foo"]
⭐️ In Rust variable are immutable by default, so we call them Variable bindings. To make them mutable, mut keyword is used.
⭐️ Rust is a statically typed language; It checks data type at compile time. But it doesn’t require you to actually type it when declare variable bindings. On that case compiler checks the usage and set a better data type for it. But for constants and statics you must annotate the type. Types come after a colon(:)
let a = true;
let b: bool = true;

let (x, y) = (1, 2);

let mut z = 5;
z = 6;
const N: i32 = 5;
static N: i32 = 5;
let keyword is used in binding expressions. We can bind a name to a value or a function. Also because of left-hand side of a let expression is a ‘pattern’, you can bind multiple names to set of values or function values.
const keyword is used to define constants. It lives for the entire lifetime of a program but have no fixed address in memory. static keyword is used to define ‘global variable’ type facility. There is only one instance for each value, and it’s at a fixed location in memory.
💡 Always use const, instead of static. It’s pretty rare that you actually want a memory location associated with your constant, and using a const allows for optimizations like constant propagation not only in your crate but also in downstream crates.
💡 Usually statics are placed at top of the code file, outside the functions.
fn(). If you want to return a value, return type must be specified after ->//Hello world function
fn main() {
println!("Hello, world!");
}
//Function with arguments
fn print_sum(a: i8, b: i8) {
println!("sum is: {}", a + b);
}
//Returning
fn plus_one(a: i32) -> i32 {
a + 1 //no ; means an expression, return a+1
}
fn plus_two(a: i32) -> i32 {
return a + 2; //return a+2 but bad practice,
//should use only on conditional returnes, except it's last expression
}
// ⭐️ Function pointers, Usage as a Data Type
let b = plus_one;
let c = b(5); //6
let b: fn(i32) -> i32 = plus_one; //same, with type inference
let c = b(5); //6
let b = plus_one;
fn plus_two(b: fn(i32) -> i32, x: i32) -> i32 {
b(b(x))
}
println!("{}", plus_two(b, 2)); //4
let x = true;
let y: bool = false;

// ⭐️ no TRUE, FALSE, 1, 0
let x = 'x';
let y = '😎';

// ⭐️ no "x", only single quotes
//because of Unicode support, char is not a single byte, but four.
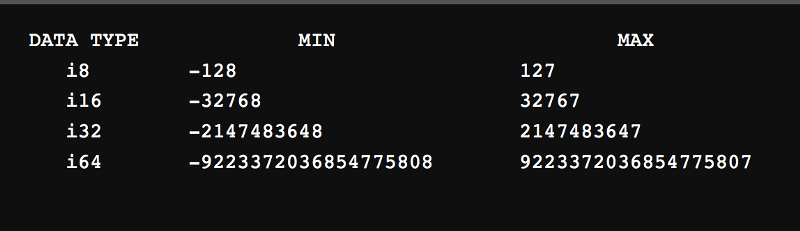
💡 Min and max values are based on IEEE standard for Binary Floating-Point Arithmetic; From -2ⁿ⁻¹ to 2ⁿ⁻¹-1 . You can use min_value() and max_value()to find min and max of each integer type, ex. i8::min_value();
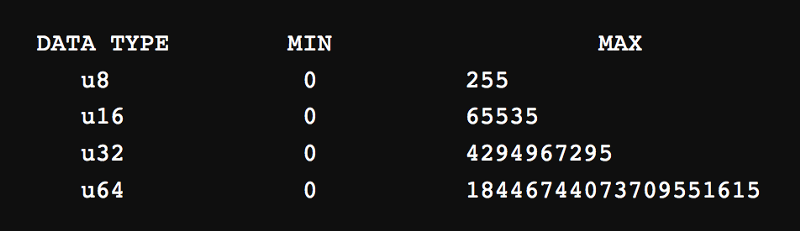
💡 Same as signed numbers, min and max values are based on IEEE standard for Binary Floating-Point Arithmetic; From 0 to 2ⁿ-1. Same way you can use min_value() and max_value() to find min and max of each integer type, ex. u8::max_value();
let a = [1, 2, 3]; // a[0] = 1, a[1] = 2, a[2] = 3
let mut b = [1, 2, 3];

let c: [int; 3] = [1, 2, 3]; //[Type; NO of elements]

let d: ["my value"; 3]; //["my value", "my value", "my value"];

let e: [i32; 0] = []; //empty array

println!("{:?}", a); //[1, 2, 3]
println!("{:#?}", a);
//  [
//      1,
//      2,
//      3
//  ]
⭐️ Arrays are immutable by default and also even with mut, its element count can not be changed.
*🔎 *If you are looking for a dynamic/ growable array, you can use Vec. Vectors can contain any type of elements but all elements must be in the same data type.
let a = (1, 1.5, true, 'a', "Hello, world!");
// a.0 = 1, a.1 = 1.5, a.2 = true, a.3 = 'a', a.4 = "Hello, world!"

let b: (i32, f64) = (1, 1.5);

let (c, d) = b; // c = 1, d = 1.5
let (e, _, _, _, f) = a; //e = 1, f = "Hello, world!", _ indicates not interested of that item

let g = (0,); //single-element tuple

let h = (b, (2, 4), 5); //((1, 1.5), (2, 4), 5)

println!("{:?}", a); //(1, 1.5, true, 'a', "Hello, world!")
println!("{:#?}", a);
//  (
//      1,
//      1.5,
//      true,
//      'a',
//      "Hello, world!"
//  )
⭐️ Tuples are also immutable by default and even with mut, its element count can not be changed. Also if you want to change an element’s value, new value should have the same data type of previous value.
let a: [i32; 4] = [1, 2, 3, 4];//Parent Array

let b: &[i32] = &a; //Slicing whole array
let c = &a[0..4]; // From 0th position to 4th(excluding)
let d = &a[..]; //Slicing whole array

let e = &a[1..3]; //[2, 3]
let e = &a[1..]; //[2, 3, 4]
let e = &a[..3]; //[1, 2, 3]
let a = "Hello, world."; //a: &'static str
let b: &str = "こんにちは, 世界!";
⭐️ str is an immutable/statically allocated slice holding an unknown sized sequence of UTF-8 code points stored in somewhere in memory. &str can be used to borrow and assign the whole array to the given variable binding.
🔎 A String is a heap-allocated string. This string is growable, and is also guaranteed to be UTF-8. They are commonly created by converting from a string slice using the to_string() and String::from() methods. ex: “Hello”.to_string(); String::from(“Hello”);
💡 In general, you should use String when you need ownership, and &str when you just need to borrow a string.
fn plus_one(a: i32) -> i32 {
    a + 1
}

let b = plus_one;
let c = b(5); //6

let b: fn(i32) -> i32 = plus_one; //same, with type inference
let c = b(5); //6

let b = plus_one;
fn plus_two(b: fn(i32) -> i32, x: i32) -> i32 {
    b(b(x))
}
println!("{}", plus_two(b, 2)); //4
let a = 5;
let b = a + 1; //6
let c = a - 1; //4
let d = a * 2; //10
let e = a / 2; // ⭐️ 2 not 2.5
let f = a % 2; //1

let g = 5.0 / 2.0; //2.5
🔎 Also + is used for array and string concatenation
let a = 1;
let b = 2;

let c = a == b; //false
let d = a != b; //true
let e = a < b; //true
let f = a > b; //false
let g = a <= a; //true
let h = a >= a; //true

// 🔎
let i = true > false; //true
let j = 'a' > 'A'; //true
| Logical Operators : ! && |
let a = true;
let b = false;

let c = !a; //false
let d = a && b; //false
let e = a || b; //true
🔎 On integer types, ! inverts the individual bits in the two’s complement representation of the value.
let a = !-2; //1
let b = !-1; //0
let c = !0; //-1
let d = !1; //-2
| Bitwise Operators : & | ^ « » |
let a = 1;
let b = 2;

let c = a & b; //0  (01 && 10 -> 00)
let d = a | b; //3  (01 || 10 -> 11)
let e = a ^ b; //3  (01 != 10 -> 11)
let f = a << b; //4  (add 2 positions to the end -> '01'+'00' -> 100)
let g = a >> a; //0  (remove 2 positions from the end -> o̶1̶ -> 0)
= operator is used to assign a name to a value or a function. Compound Assignment Operators are created by composing one of + - * / % & | ^ << >> operators with = operator.let mut a = 2;
a += 5; //2 + 5 = 7
a -= 2; //7 - 2 = 5
a *= 5; //5 * 5 = 25
a /= 2; //25 / 2 = 12 not 12.5
a %= 5; //12 % 5 = 2
a &= 2; //10 && 10 -> 10 -> 2
a |= 5; //010 || 101 -> 111 -> 7
a ^= 2; //111 != 010 -> 101 -> 5
a <<= 1; //'101'+'0' -> 1010 -> 10
a >>= 2; //101̶0̶ -> 10 -> 2
let a = 15;
let b = (a as f64) / 2.0; //7.5
// Simplest Example
let team_size = 7;
if team_size < 5 {
    println!("Small");
} else if team_size < 10 {
    println!("Medium");
} else {
    println!("Large");
}

// partially refactored code
let team_size = 7;
let team_size_in_text;
if team_size < 5 {
    team_size_in_text = "Small";
} else if team_size < 10 {
    team_size_in_text = "Medium";
} else {
    team_size_in_text = "Large";
}
println!("Current team size : {}", team_size_in_text);

//optimistic code
let team_size = 7;
let team_size_in_text = if team_size < 5 {
    "Small" //⭐️no ;
} else if team_size < 10 {
    "Medium"
} else {
    "Large"
};
println!("Current team size : {}", team_size_in_text);


let is_below_eighteen = if team_size < 18 { true } else { false };
⭐️ Return data type should be same on each block, when using this as an expression.
let tshirt_width = 20;
let tshirt_size = match tshirt_width {
    16 => "S", // check 16
    17 | 18 => "M", // check 17 and 18
    19 ... 21 => "L", // check from 19 to 21 (19,20,21)
    22 => "XL",
    _ => "Not Available",
};
println!("{}", tshirt_size); // L


let is_allowed = false;
let list_type = match is_allowed {
    true => "Full",
    false => "Restricted"
    // no default/ _ condition can be skipped
    // Because data type of is_allowed is boolean and all possibilities checked on conditions
};
println!("{}", list_type); // Restricted


let marks_paper_a: u8 = 25;
let marks_paper_b: u8 = 30;
let output = match (marks_paper_a, marks_paper_b) {
    (50, 50) => "Full marks for both papers",
    (50, _) => "Full marks for paper A",
    (_, 50) => "Full marks for paper B",
    (x, y) if x > 25 && y > 25 => "Good",
    (_, _) => "Work hard"
};
println!("{}", output); // Work hard
let mut a = 1;
while a <= 10 {
	println!("Current value : {}", a);
	a += 1; //no ++ or -- in Rust
}

// Usage of break and continue
let mut b = 0;
while b < 5 {
	if b == 0 {
		println!("Skip value : {}", b);
		b += 1;
		continue;
	} else if b == 2 {
		println!("Break At : {}", b);
		break;
	}
	println!("Current value : {}", b);
	b += 1;
}

// Outer break
let mut c1 = 1;
'outer_while: while c1 < 6 { //set label outer_while
	let mut c2 = 1;
	'inner_while: while c2 < 6 {
		println!("Current Value : [{}][{}]", c1, c2);
		if c1 == 2 && c2 == 2 { break 'outer_while; } //kill outer_while
		c2 += 1;
	}
	c1 += 1;
}
loop {
	println!("Loop forever!");
}

// Usage of break and continue
let mut a = 0;
loop {
	if a == 0 {
		println!("Skip Value : {}", a);
		a += 1;
		continue;
	} else if a == 2 {
		println!("Break At : {}", a);
		break;
	}
	println!("Current Value : {}", a);
	a += 1;
}

// Outer break
let mut b1 = 1;
'outer_loop: loop { //set label outer_loop
  let mut b2 = 1;
  'inner_loop: loop {
    println!("Current Value : [{}][{}]", b1, b2);
    if b1 == 2 && b2 == 2 {
        break 'outer_loop; // kill outer_loop
    } else if b2 == 5 {
    	break;
    }
    b2 += 1;
  }
  b1 += 1;
}
for a in 0..10 { //(a = 0; a <10; a++) // 0 to 10(exclusive)
  println!("Current value : {}", a);
}

// Usage of break and continue
for b in 0..6 {
  if b == 0 {
    println!("Skip Value : {}", b);
    continue;
  } else if b == 2 {
    println!("Break At : {}", b);
    break;
  }
  println!("Current value : {}", b);
}

// Outer break
'outer_for: for c1 in 1..6 { //set label outer_for
  'inner_for: for c2 in 1..6 {
    println!("Current Value : [{}][{}]", c1, c2);
    if c1 == 2 && c2 == 2 { break 'outer_for; } //kill outer_for
  }
}


// Working with arrays/vectors
let group : [&str; 4] = ["Mark", "Larry", "Bill", "Steve"];

for n in 0..group.len() { //group.len() = 4 -> 0..4 👎 check group.len()on each iteration
  println!("Current Person : {}", group[n]);
}

for person in group.iter() { //👍 group.iter() turn the array into a simple iterator
  println!("Current Person : {}", person);
}
OK, Let’s stop the first post of Learning Rust series in here. In this post I just tried to summarize about the very basics of Rust .
▸ Installation & Hello World ▸ Cargo & Crates ▸ Variable bindings , Constants & Statics ▸ Comments ▸ Functions ▸ Primitive Data Types ▸ Operators ▸ Control Flows
🐣 As you know, I am not an expert in Rust. I’m a learner who is just learning Rust. So if you found any mistake or something I need to change, even a spelling or a grammar mistake, please let me know. Thanks.
🎓 For more information you can go through,
👥 To get a help,
📚 Books
“Every great wizard in history has started out as nothing more than what we are now, students. If they can do it, why not us?” J.K. Rowling (Harry Potter and the Order of the Phoenix)
NEXT ▸ Vectors ▸ Structs ▸ Enums ▸ Generics ▸ Impls & Traits
Machine Learnig Enthusiast
© 2018 Shabbir Hasan